Extensions, MCP, and channels
Install reviewed packages, plugins, MCP servers, and skills; connect messaging sources; and control who may trigger replies or broadcasts.
Find one workflow
Filter this collection by name, outcome, provider, engine, channel, mode, or command.
Install a ClawHub package
Review trust and capabilities before adding a curated extension bundle.
Before you start
- Internet access.
- A specific capability you need.
Open Extensions > ClawHub and search by outcome, not by installing a large bundle at random.
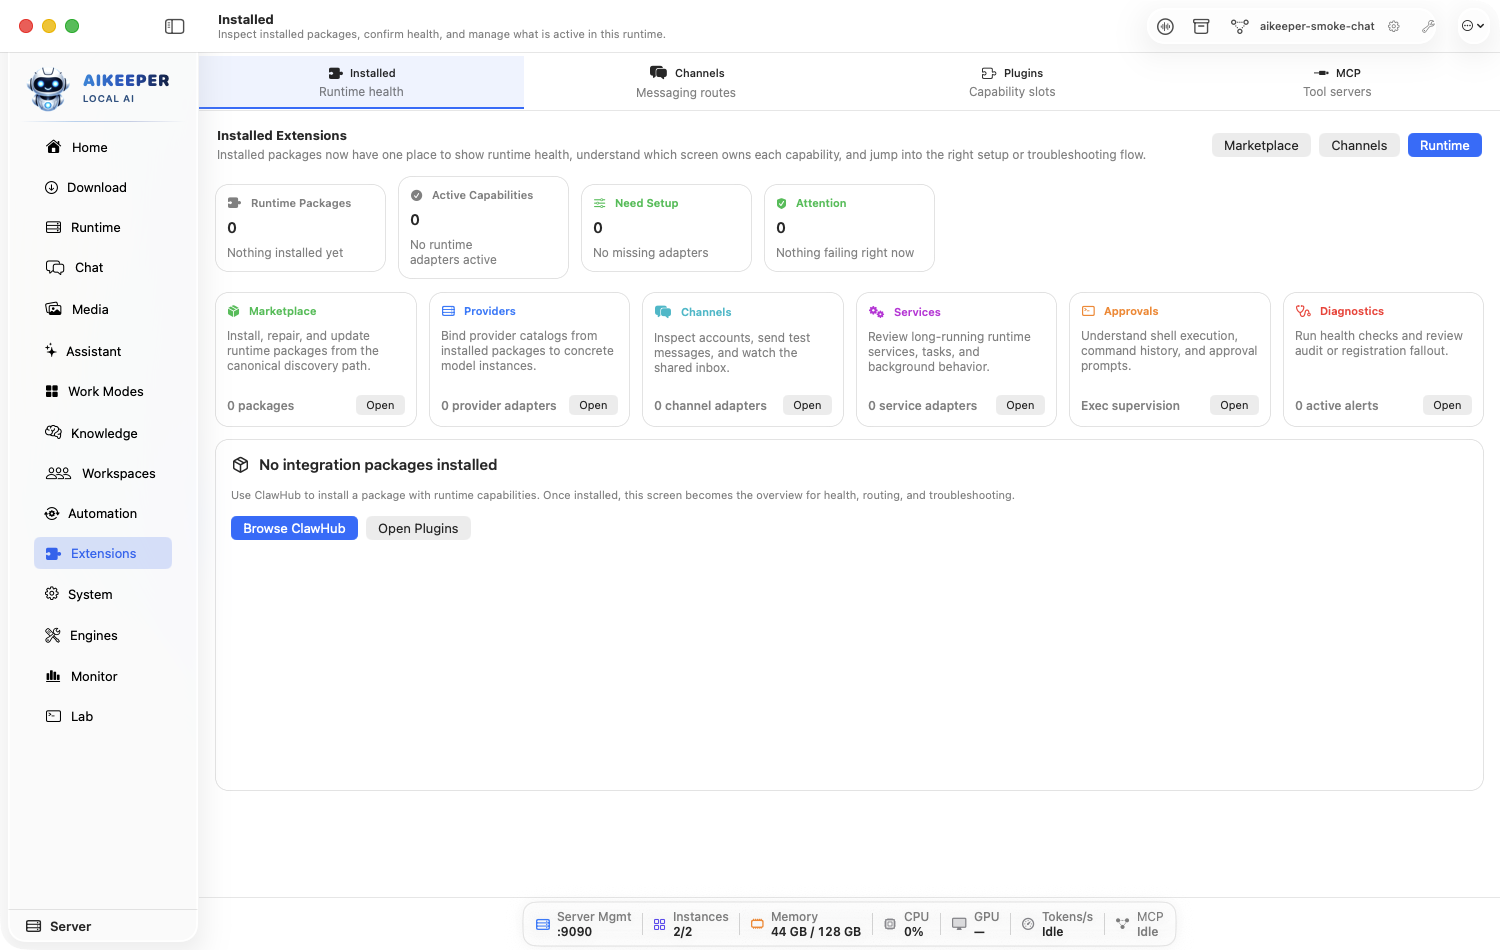
Open the package and review publisher, version, trust signals, files, permissions, dependencies, and contributed capabilities.
Install. Resolve only the package's stated requirements.
Open Extensions > Installed, select the package, and check runtime health.
Test its smallest non-destructive capability before granting broader tool access.
You are done when
Installed shows a healthy version and the expected capability appears where documented.Install, configure, update, or remove a plugin
Treat in-process plugins as higher-trust code and verify their contributed surfaces.
Before you start
- A trusted plugin source.
- Awareness that plugins run inside the app process.
Discover/install the plugin through its supported package path, then open Extensions > Plugins.
Review its identity, version, lifecycle state, contributed UI/tools/services, and configuration requirements.
Configure secrets through the Secrets store and enable only after review.
Test one contributed capability. For updates, read changes and re-test; for removal, disable first and check dependents.
You are done when
The plugin is enabled only when healthy, its capability works, and disabling/removing it makes that capability unavailable without harming unrelated extensions.Install an MCP server from a registry
Add external tools/resources through Model Context Protocol and inspect what is actually discovered.
Before you start
- A known MCP server from the official/Smithery registry.
- Any required account or API credentials.
Open Extensions > MCP, search the registry, and inspect transport, command/URL, publisher, and requested configuration.
Install the server. Put secrets in the protected fields/Secrets store, not inline in command arguments when a reference is supported.
Open Extensions > MCP, enable the server, and connect.
Inspect discovered tools and resources page by page. Keep only the server roots and tools the workflow needs.
Call one read-only tool from a test Chat.
You are done when
The server shows connected, protocol handshake completes, tools/resources are listed, and one read-only call returns data.Add a local stdio MCP server
Configure a process-backed MCP server with an exact executable, arguments, environment, and allowed roots.
Before you start
- The server's executable is installed.
- Its current launch documentation and required environment.
Open Extensions > MCP and create a local/stdio server.
Enter the exact executable and argument list. Avoid wrapping an ordinary server in an unrestricted shell command.
Add required environment values through protected configuration. Select the minimum filesystem roots.
Save and connect. Inspect startup logs for a clean JSON-RPC initialization rather than human-readable output on stdout.
List tools/resources and test one read-only operation.
You are done when
The stdio process stays running, initializes with the supported MCP revision, and returns a valid tool/resource list.Add a hosted MCP server
Connect to an HTTP/SSE/streamable endpoint and keep authentication scoped to that server.
Before you start
- A trusted HTTPS MCP endpoint.
- Its authentication method.
Create a hosted MCP entry under Extensions > MCP.
Enter the exact endpoint and supported transport. Prefer HTTPS and verify the host.
Store the token/credential in Secrets and attach it to this server only.
Connect, inspect the negotiated capabilities, then list all pages of tools/resources.
Test a read-only call and inspect Activity > Requests plus the Audit Trail.
You are done when
Authentication succeeds, discovery completes, and the audit trail attributes calls to the correct hosted server.Let Claude Desktop or Cursor drive Ai Keeper (MCP server mode)
Point an external MCP host at Ai Keeper so it can use this Mac's chat, tools, memory, canvas, and skills — the reverse of the three workflows above.
Before you start
- At least one Ready model, so a tool call has something to run on.
- An MCP host you control: Claude Desktop, Cursor, Zed, or your own script.
- Both ends on this Mac for the first test. Only expose the endpoint beyond localhost after the remote-access workflow.
Understand which direction this is. The other MCP workflows let Ai Keeper use someone else's tools. This one lets someone else use Ai Keeper's — chat, tools, memory, canvas, and skills, through one endpoint.
The server runs inside the same process as the proxy, so anything you can do in the UI can be driven over MCP.
Open Settings > Connection and find the Model Context Protocol card. Its own subtitle says every toggle is disabled by default — that is deliberate.
Expand Connection details and read the MCP endpoint and Server-sent events rows. Use Copy connection info to put the whole thing on the clipboard as JSON rather than retyping it.
Check the endpoint answers before touching your MCP host's config. A JSON-RPC result — not a connection error — means the server is live.
Replace 11434 with your real proxy port if you changed it — the MCP endpoint rides on the proxy port, not a separate one.
curl -sS -X POST http://127.0.0.1:11434/mcp \ -H 'content-type: application/json' \ -d '{"jsonrpc":"2.0","id":1,"method":"initialize", "params":{"protocolVersion":"2025-03-26", "capabilities":{}, "clientInfo":{"name":"curl","version":"0.1"}}}'shellAdd Ai Keeper to Claude Desktop's MCP config, then restart it.
{ "mcpServers": { "aikeeper": { "type": "http", "url": "http://localhost:11434/mcp" } } }jsonFor Cursor, give it the events stream as well so server-initiated notifications arrive.
Resource subscriptions only work over the SSE transport. POST-only clients still work, they just never get notified of changes.
{ "mcp.servers": { "aikeeper": { "url": "http://localhost:11434/mcp", "events": "http://localhost:11434/mcp/events" } } }jsonIn the host, list the tools it discovered and run one harmless read-only call. Then confirm it in Activity > Requests and the Audit Trail.
Only now decide about the optional toggles. Require OAuth 2.1 for MCP HTTP clients is the one to turn on before this endpoint is reachable by anything but this Mac.
Turning OAuth on without registering a client first makes every call return 401 — register the client, or leave it off while you are local-only.
You are done when
The external host lists Ai Keeper's tools, one read-only call returns a result, and the call appears in Activity > Requests attributed to the MCP route.-32600 invalid request: session expiredEvery request after initialize must echo back the Mcp-Session-Id header the server returned. Simple curl scripts that start fresh each call hit this — persist the header, or re-initialize.WWW-Authenticate: BearerOAuth enforcement is on but no client is registered. Register one, or turn the toggle back off for local-only use.resources/subscribe seems ignoredSubscriptions need the SSE transport. Confirm the host is connected to /mcp/events and that the resource URI matches case-for-case.Add a Slack, Discord, Matrix, IRC, or other catalog connector
Configure one of the native/experimental shared-inbox sources and prove one message arrives.
Before you start
- A bot/token/webhook or server account for the platform.
- Permission to connect the selected workspace/channel.
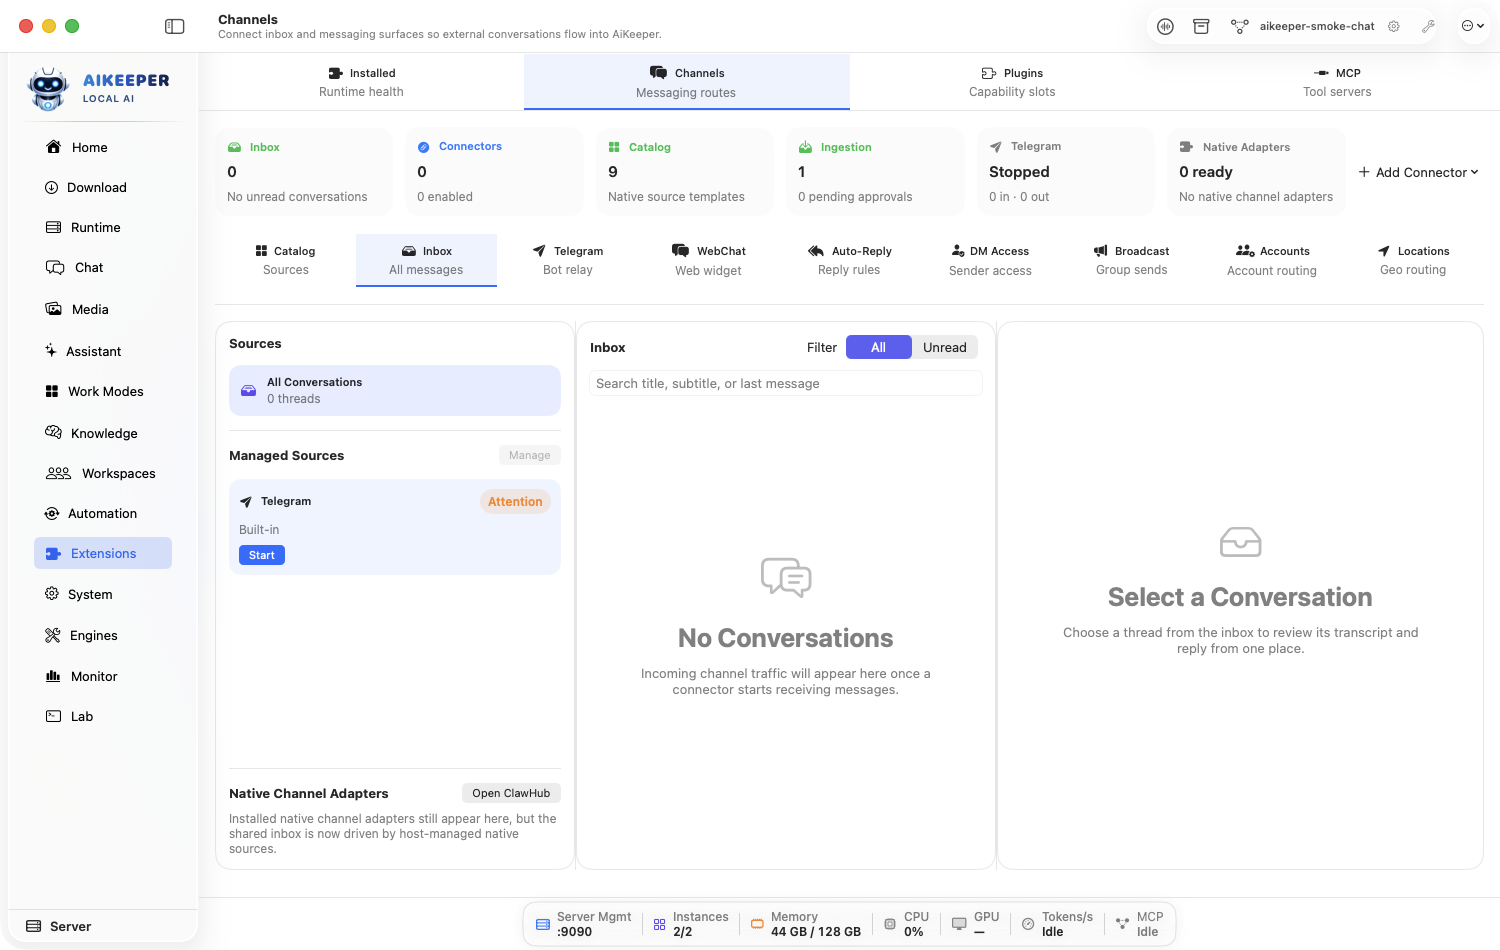
Open Extensions > Channels > Catalog and choose Slack, Discord, Twitch, IRC, Mattermost, Nextcloud Talk, WhatsApp, Matrix, or WebChat.
Read its readiness, setup path, supported transport, data scopes, and memory behavior. Click Add Connector.
Enter server/workspace/channel identifiers, select polling/webhook/stream/local as supported, and store credentials securely.
Enable the connector and send one harmless message in the source platform.
Open Extensions > Channels > Inbox and filter by the new source.
You are done when
The connector health is running and the test message appears once with the correct sender and source.Connect a Telegram bot
Set up the dedicated Telegram relay and restrict who may use it.
Before you start
- A bot token from BotFather.
- The numeric user/chat IDs you intend to allow.
Open Extensions > Channels > Telegram.
Store the bot token through the protected field and start/verify the relay.
Open DM Access and pair/allow only your test sender before enabling Auto-Reply.
Send a test DM to the bot. Check Telegram status and the shared Inbox.
Enable reply behavior only after inbound identity and threading are correct.
You are done when
The allowed sender's message appears and receives at most one reply; an unpaired sender is blocked by policy.Enable and test WebChat
Offer a local web conversation surface and control host, auth, and reply behavior.
Before you start
- A Ready chat route.
- For network exposure, a deliberate Remote Access and authentication plan.
Open Extensions > Channels > WebChat and enable the local widget/service.
Keep it loopback-only for the first test. Configure the model and session behavior.
Open the displayed local URL in a browser and send a harmless message.
Confirm it appears under Inbox and the browser receives a reply.
If exposing beyond the Mac, stop and complete Remote Access, authentication, and firewall review first.
You are done when
One browser session creates one threaded conversation and messages round-trip through the selected route.Configure Auto-Reply and DM Access
Decide which senders can trigger the model and what reply rules apply.
Before you start
- A connector that reliably receives one message once.
- A known test sender.
Open Extensions > Channels > DM Access and add/pair the known sender identity.
Open Auto-Reply, choose the connector/account, routing model/agent, mention/DM rules, cooldown, and safe tool policy.
Keep channel-send, command, file-write, and external actions approval-gated.
Send one message from the allowed identity and one from an unpaired test identity.
Inspect Inbox, health, and Audit Trail.
You are done when
The allowed message routes to one response; the unpaired identity receives no model-triggered response or the configured safe denial.Broadcast through multiple accounts or locations
Route an outbound message to reviewed targets without mixing account, tenant, or geographic context.
Before you start
- Healthy outbound-capable connectors.
- Permission from recipients and a non-sensitive test message.
Open Extensions > Channels > Accounts and label each connector account clearly.
Use Locations to define any location-aware routing only when the workflow needs it.
Open Broadcast, choose explicit accounts/recipients, and preview the final target list.
Send a harmless test to a small target set. Do not use all accounts for the first run.
Inspect per-target delivery results and audit entries.
You are done when
Only the previewed recipients receive the message, with each delivery attributed to the intended account.Connect Slack
Set up the native Slack route over polling or webhook, test the smallest safe scope, and keep direct messages approval-gated.
Before you start
- Bot token; webhook verification where used
- A disposable Slack test conversation or destination.
- A Ready model/provider route if Auto-Reply will be tested.
Open Extensions > Channels and add Slack. Choose Polling or webhook only when it matches the account/bridge you prepared.
Save credentials through the channel secret fields or Secret Store. Grant only the minimum scope needed for Channels, threads, and mentions.
Keep the connector disabled until its built-in connection test accepts the server, token, and destination.
Enable the connector, set DM Access to pairing or an explicit allowlist, and leave Auto-Reply off for the first transport test.
Send Ai Keeper Slack connection test to the disposable destination. Confirm it arrives once and inspect the connector status/inbox.
Only after transport succeeds, enable Auto-Reply for the test destination, send one benign inbound message, approve pairing if requested, and turn Auto-Reply back off if it is not required.
You are done when
Slack reports healthy, the controlled outbound message arrives once, and any accepted inbound message is authenticated and visible in the shared inbox/audit trail.Connect Discord
Set up the native Discord route over polling, test the smallest safe scope, and keep direct messages approval-gated.
Before you start
- Bot token
- A disposable Discord test conversation or destination.
- A Ready model/provider route if Auto-Reply will be tested.
Open Extensions > Channels and add Discord. Choose Polling only when it matches the account/bridge you prepared.
Save credentials through the channel secret fields or Secret Store. Grant only the minimum scope needed for Server channels and direct messages.
Keep the connector disabled until its built-in connection test accepts the server, token, and destination.
Enable the connector, set DM Access to pairing or an explicit allowlist, and leave Auto-Reply off for the first transport test.
Send Ai Keeper Discord connection test to the disposable destination. Confirm it arrives once and inspect the connector status/inbox.
Only after transport succeeds, enable Auto-Reply for the test destination, send one benign inbound message, approve pairing if requested, and turn Auto-Reply back off if it is not required.
You are done when
Discord reports healthy, the controlled outbound message arrives once, and any accepted inbound message is authenticated and visible in the shared inbox/audit trail.Connect Twitch
Set up the native Twitch route over stream, test the smallest safe scope, and keep direct messages approval-gated.
Before you start
- Twitch/IRC connection credentials
- A disposable Twitch test conversation or destination.
- A Ready model/provider route if Auto-Reply will be tested.
Open Extensions > Channels and add Twitch. Choose Stream only when it matches the account/bridge you prepared.
Save credentials through the channel secret fields or Secret Store. Grant only the minimum scope needed for Live chat.
Keep the connector disabled until its built-in connection test accepts the server, token, and destination.
Enable the connector, set DM Access to pairing or an explicit allowlist, and leave Auto-Reply off for the first transport test.
Send Ai Keeper Twitch connection test to the disposable destination. Confirm it arrives once and inspect the connector status/inbox.
Only after transport succeeds, enable Auto-Reply for the test destination, send one benign inbound message, approve pairing if requested, and turn Auto-Reply back off if it is not required.
You are done when
Twitch reports healthy, the controlled outbound message arrives once, and any accepted inbound message is authenticated and visible in the shared inbox/audit trail.Connect IRC
Set up the native IRC route over stream, test the smallest safe scope, and keep direct messages approval-gated.
Before you start
- Server, nickname, and channel
- A disposable IRC test conversation or destination.
- A Ready model/provider route if Auto-Reply will be tested.
Open Extensions > Channels and add IRC. Choose Stream only when it matches the account/bridge you prepared.
Save credentials through the channel secret fields or Secret Store. Grant only the minimum scope needed for IRC channels.
Keep the connector disabled until its built-in connection test accepts the server, token, and destination.
Enable the connector, set DM Access to pairing or an explicit allowlist, and leave Auto-Reply off for the first transport test.
Send Ai Keeper IRC connection test to the disposable destination. Confirm it arrives once and inspect the connector status/inbox.
Only after transport succeeds, enable Auto-Reply for the test destination, send one benign inbound message, approve pairing if requested, and turn Auto-Reply back off if it is not required.
You are done when
IRC reports healthy, the controlled outbound message arrives once, and any accepted inbound message is authenticated and visible in the shared inbox/audit trail.Connect Mattermost
Set up the native Mattermost route over polling, test the smallest safe scope, and keep direct messages approval-gated.
Before you start
- Server URL and access token
- A disposable Mattermost test conversation or destination.
- A Ready model/provider route if Auto-Reply will be tested.
Open Extensions > Channels and add Mattermost. Choose Polling only when it matches the account/bridge you prepared.
Save credentials through the channel secret fields or Secret Store. Grant only the minimum scope needed for Teams and channels.
Keep the connector disabled until its built-in connection test accepts the server, token, and destination.
Enable the connector, set DM Access to pairing or an explicit allowlist, and leave Auto-Reply off for the first transport test.
Send Ai Keeper Mattermost connection test to the disposable destination. Confirm it arrives once and inspect the connector status/inbox.
Only after transport succeeds, enable Auto-Reply for the test destination, send one benign inbound message, approve pairing if requested, and turn Auto-Reply back off if it is not required.
You are done when
Mattermost reports healthy, the controlled outbound message arrives once, and any accepted inbound message is authenticated and visible in the shared inbox/audit trail.Connect Nextcloud Talk
Set up the native Nextcloud Talk route over webhook, test the smallest safe scope, and keep direct messages approval-gated.
Before you start
- Nextcloud Talk webhook credentials
- A disposable Nextcloud Talk test conversation or destination.
- A Ready model/provider route if Auto-Reply will be tested.
Open Extensions > Channels and add Nextcloud Talk. Choose Webhook only when it matches the account/bridge you prepared.
Save credentials through the channel secret fields or Secret Store. Grant only the minimum scope needed for Rooms.
Keep the connector disabled until its built-in connection test accepts the server, token, and destination.
Enable the connector, set DM Access to pairing or an explicit allowlist, and leave Auto-Reply off for the first transport test.
Send Ai Keeper Nextcloud Talk connection test to the disposable destination. Confirm it arrives once and inspect the connector status/inbox.
Only after transport succeeds, enable Auto-Reply for the test destination, send one benign inbound message, approve pairing if requested, and turn Auto-Reply back off if it is not required.
You are done when
Nextcloud Talk reports healthy, the controlled outbound message arrives once, and any accepted inbound message is authenticated and visible in the shared inbox/audit trail.Connect WhatsApp
Set up the experimental WhatsApp route over webhook, test the smallest safe scope, and keep direct messages approval-gated.
Before you start
- Phone number ID, verify token, and platform secret
- A disposable WhatsApp test conversation or destination.
- A Ready model/provider route if Auto-Reply will be tested.
Open Extensions > Channels and add WhatsApp. Choose Webhook only when it matches the account/bridge you prepared.
Save credentials through the channel secret fields or Secret Store. Grant only the minimum scope needed for Messages and newsletters.
Keep the connector disabled until its built-in connection test accepts the server, token, and destination.
Enable the connector, set DM Access to pairing or an explicit allowlist, and leave Auto-Reply off for the first transport test.
Send Ai Keeper WhatsApp connection test to the disposable destination. Confirm it arrives once and inspect the connector status/inbox.
Only after transport succeeds, enable Auto-Reply for the test destination, send one benign inbound message, approve pairing if requested, and turn Auto-Reply back off if it is not required.
You are done when
WhatsApp reports healthy, the controlled outbound message arrives once, and any accepted inbound message is authenticated and visible in the shared inbox/audit trail.Connect Matrix
Set up the native Matrix route over polling, test the smallest safe scope, and keep direct messages approval-gated.
Before you start
- Homeserver URL and access token
- A disposable Matrix test conversation or destination.
- A Ready model/provider route if Auto-Reply will be tested.
Open Extensions > Channels and add Matrix. Choose Polling only when it matches the account/bridge you prepared.
Save credentials through the channel secret fields or Secret Store. Grant only the minimum scope needed for Rooms.
Keep the connector disabled until its built-in connection test accepts the server, token, and destination.
Enable the connector, set DM Access to pairing or an explicit allowlist, and leave Auto-Reply off for the first transport test.
Send Ai Keeper Matrix connection test to the disposable destination. Confirm it arrives once and inspect the connector status/inbox.
Only after transport succeeds, enable Auto-Reply for the test destination, send one benign inbound message, approve pairing if requested, and turn Auto-Reply back off if it is not required.
You are done when
Matrix reports healthy, the controlled outbound message arrives once, and any accepted inbound message is authenticated and visible in the shared inbox/audit trail.Connect WebChat Conversations
Set up the native WebChat Conversations route over local, test the smallest safe scope, and keep direct messages approval-gated.
Before you start
- Ai Keeper API authentication when exposed
- A disposable WebChat Conversations test conversation or destination.
- A Ready model/provider route if Auto-Reply will be tested.
Open Extensions > Channels and add WebChat Conversations. Choose Local only when it matches the account/bridge you prepared.
Save credentials through the channel secret fields or Secret Store. Grant only the minimum scope needed for Local web conversations.
Keep the connector disabled until its built-in connection test accepts the server, token, and destination.
Enable the connector, set DM Access to pairing or an explicit allowlist, and leave Auto-Reply off for the first transport test.
Send Ai Keeper WebChat Conversations connection test to the disposable destination. Confirm it arrives once and inspect the connector status/inbox.
Only after transport succeeds, enable Auto-Reply for the test destination, send one benign inbound message, approve pairing if requested, and turn Auto-Reply back off if it is not required.
You are done when
WebChat Conversations reports healthy, the controlled outbound message arrives once, and any accepted inbound message is authenticated and visible in the shared inbox/audit trail.Connect Telegram
Set up the native Telegram route over bot polling, test the smallest safe scope, and keep direct messages approval-gated.
Before you start
- Telegram bot token from BotFather
- A disposable Telegram test conversation or destination.
- A Ready model/provider route if Auto-Reply will be tested.
Open Extensions > Channels and add Telegram. Choose Bot polling only when it matches the account/bridge you prepared.
Save credentials through the channel secret fields or Secret Store. Grant only the minimum scope needed for Bot chats allowed by pairing and DM policy.
Keep the connector disabled until its built-in connection test accepts the server, token, and destination.
Enable the connector, set DM Access to pairing or an explicit allowlist, and leave Auto-Reply off for the first transport test.
Send Ai Keeper Telegram connection test to the disposable destination. Confirm it arrives once and inspect the connector status/inbox.
Only after transport succeeds, enable Auto-Reply for the test destination, send one benign inbound message, approve pairing if requested, and turn Auto-Reply back off if it is not required.
You are done when
Telegram reports healthy, the controlled outbound message arrives once, and any accepted inbound message is authenticated and visible in the shared inbox/audit trail.Connect Google Chat
Set up the extended Google Chat route over webhook, test the smallest safe scope, and keep direct messages approval-gated.
Before you start
- Google Chat webhook/bot credentials
- A disposable Google Chat test conversation or destination.
- A Ready model/provider route if Auto-Reply will be tested.
Open Extensions > Channels and add Google Chat. Choose Webhook only when it matches the account/bridge you prepared.
Save credentials through the channel secret fields or Secret Store. Grant only the minimum scope needed for Outbound messages; authenticated inbound bridge when available.
For an extended webhook connector, start with outbound-only testing. Do not enable unsigned inbound delivery; an authenticated bridge and platform signature check are required.
Enable the connector, set DM Access to pairing or an explicit allowlist, and leave Auto-Reply off for the first transport test.
Send Ai Keeper Google Chat connection test to the disposable destination. Confirm it arrives once and inspect the connector status/inbox.
Only after transport succeeds, enable Auto-Reply for the test destination, send one benign inbound message, approve pairing if requested, and turn Auto-Reply back off if it is not required.
You are done when
Google Chat reports healthy, the controlled outbound message arrives once, and any accepted inbound message is authenticated and visible in the shared inbox/audit trail.Connect Signal
Set up the extended Signal route over signal-cli / rest bridge, test the smallest safe scope, and keep direct messages approval-gated.
Before you start
- Trusted Signal bridge URL and credentials
- A disposable Signal test conversation or destination.
- A Ready model/provider route if Auto-Reply will be tested.
Open Extensions > Channels and add Signal. Choose signal-cli / REST bridge only when it matches the account/bridge you prepared.
Save credentials through the channel secret fields or Secret Store. Grant only the minimum scope needed for Signal messages.
For an extended webhook connector, start with outbound-only testing. Do not enable unsigned inbound delivery; an authenticated bridge and platform signature check are required.
Enable the connector, set DM Access to pairing or an explicit allowlist, and leave Auto-Reply off for the first transport test.
Send Ai Keeper Signal connection test to the disposable destination. Confirm it arrives once and inspect the connector status/inbox.
Only after transport succeeds, enable Auto-Reply for the test destination, send one benign inbound message, approve pairing if requested, and turn Auto-Reply back off if it is not required.
You are done when
Signal reports healthy, the controlled outbound message arrives once, and any accepted inbound message is authenticated and visible in the shared inbox/audit trail.Connect BlueBubbles
Set up the extended BlueBubbles route over bluebubbles bridge, test the smallest safe scope, and keep direct messages approval-gated.
Before you start
- BlueBubbles server URL, password, and webhook secret
- A disposable BlueBubbles test conversation or destination.
- A Ready model/provider route if Auto-Reply will be tested.
Open Extensions > Channels and add BlueBubbles. Choose BlueBubbles bridge only when it matches the account/bridge you prepared.
Save credentials through the channel secret fields or Secret Store. Grant only the minimum scope needed for iMessage delivery through BlueBubbles.
For an extended webhook connector, start with outbound-only testing. Do not enable unsigned inbound delivery; an authenticated bridge and platform signature check are required.
Enable the connector, set DM Access to pairing or an explicit allowlist, and leave Auto-Reply off for the first transport test.
Send Ai Keeper BlueBubbles connection test to the disposable destination. Confirm it arrives once and inspect the connector status/inbox.
Only after transport succeeds, enable Auto-Reply for the test destination, send one benign inbound message, approve pairing if requested, and turn Auto-Reply back off if it is not required.
You are done when
BlueBubbles reports healthy, the controlled outbound message arrives once, and any accepted inbound message is authenticated and visible in the shared inbox/audit trail.Connect iMessage
Set up the extended iMessage route over messages.app, test the smallest safe scope, and keep direct messages approval-gated.
Before you start
- macOS Automation permission; authenticated mirror for inbound
- A disposable iMessage test conversation or destination.
- A Ready model/provider route if Auto-Reply will be tested.
Open Extensions > Channels and add iMessage. Choose Messages.app only when it matches the account/bridge you prepared.
Save credentials through the channel secret fields or Secret Store. Grant only the minimum scope needed for Outbound Messages.app conversations.
For an extended webhook connector, start with outbound-only testing. Do not enable unsigned inbound delivery; an authenticated bridge and platform signature check are required.
Enable the connector, set DM Access to pairing or an explicit allowlist, and leave Auto-Reply off for the first transport test.
Send Ai Keeper iMessage connection test to the disposable destination. Confirm it arrives once and inspect the connector status/inbox.
Only after transport succeeds, enable Auto-Reply for the test destination, send one benign inbound message, approve pairing if requested, and turn Auto-Reply back off if it is not required.
You are done when
iMessage reports healthy, the controlled outbound message arrives once, and any accepted inbound message is authenticated and visible in the shared inbox/audit trail.Connect Microsoft Teams
Set up the extended Microsoft Teams route over webhook, test the smallest safe scope, and keep direct messages approval-gated.
Before you start
- Teams webhook/bot credentials
- A disposable Microsoft Teams test conversation or destination.
- A Ready model/provider route if Auto-Reply will be tested.
Open Extensions > Channels and add Microsoft Teams. Choose Webhook only when it matches the account/bridge you prepared.
Save credentials through the channel secret fields or Secret Store. Grant only the minimum scope needed for Teams conversations.
For an extended webhook connector, start with outbound-only testing. Do not enable unsigned inbound delivery; an authenticated bridge and platform signature check are required.
Enable the connector, set DM Access to pairing or an explicit allowlist, and leave Auto-Reply off for the first transport test.
Send Ai Keeper Microsoft Teams connection test to the disposable destination. Confirm it arrives once and inspect the connector status/inbox.
Only after transport succeeds, enable Auto-Reply for the test destination, send one benign inbound message, approve pairing if requested, and turn Auto-Reply back off if it is not required.
You are done when
Microsoft Teams reports healthy, the controlled outbound message arrives once, and any accepted inbound message is authenticated and visible in the shared inbox/audit trail.Connect Feishu / Lark
Set up the extended Feishu / Lark route over webhook, test the smallest safe scope, and keep direct messages approval-gated.
Before you start
- Feishu/Lark app credentials and signing secret
- A disposable Feishu / Lark test conversation or destination.
- A Ready model/provider route if Auto-Reply will be tested.
Open Extensions > Channels and add Feishu / Lark. Choose Webhook only when it matches the account/bridge you prepared.
Save credentials through the channel secret fields or Secret Store. Grant only the minimum scope needed for Chats and groups.
For an extended webhook connector, start with outbound-only testing. Do not enable unsigned inbound delivery; an authenticated bridge and platform signature check are required.
Enable the connector, set DM Access to pairing or an explicit allowlist, and leave Auto-Reply off for the first transport test.
Send Ai Keeper Feishu / Lark connection test to the disposable destination. Confirm it arrives once and inspect the connector status/inbox.
Only after transport succeeds, enable Auto-Reply for the test destination, send one benign inbound message, approve pairing if requested, and turn Auto-Reply back off if it is not required.
You are done when
Feishu / Lark reports healthy, the controlled outbound message arrives once, and any accepted inbound message is authenticated and visible in the shared inbox/audit trail.Connect LINE
Set up the extended LINE route over webhook, test the smallest safe scope, and keep direct messages approval-gated.
Before you start
- LINE channel token and signing secret
- A disposable LINE test conversation or destination.
- A Ready model/provider route if Auto-Reply will be tested.
Open Extensions > Channels and add LINE. Choose Webhook only when it matches the account/bridge you prepared.
Save credentials through the channel secret fields or Secret Store. Grant only the minimum scope needed for LINE conversations.
For an extended webhook connector, start with outbound-only testing. Do not enable unsigned inbound delivery; an authenticated bridge and platform signature check are required.
Enable the connector, set DM Access to pairing or an explicit allowlist, and leave Auto-Reply off for the first transport test.
Send Ai Keeper LINE connection test to the disposable destination. Confirm it arrives once and inspect the connector status/inbox.
Only after transport succeeds, enable Auto-Reply for the test destination, send one benign inbound message, approve pairing if requested, and turn Auto-Reply back off if it is not required.
You are done when
LINE reports healthy, the controlled outbound message arrives once, and any accepted inbound message is authenticated and visible in the shared inbox/audit trail.Connect Nostr
Set up the extended Nostr route over relay, test the smallest safe scope, and keep direct messages approval-gated.
Before you start
- Relay URL and reviewed signing identity
- A disposable Nostr test conversation or destination.
- A Ready model/provider route if Auto-Reply will be tested.
Open Extensions > Channels and add Nostr. Choose Relay only when it matches the account/bridge you prepared.
Save credentials through the channel secret fields or Secret Store. Grant only the minimum scope needed for Relay-backed publishing.
For an extended webhook connector, start with outbound-only testing. Do not enable unsigned inbound delivery; an authenticated bridge and platform signature check are required.
Enable the connector, set DM Access to pairing or an explicit allowlist, and leave Auto-Reply off for the first transport test.
Send Ai Keeper Nostr connection test to the disposable destination. Confirm it arrives once and inspect the connector status/inbox.
Only after transport succeeds, enable Auto-Reply for the test destination, send one benign inbound message, approve pairing if requested, and turn Auto-Reply back off if it is not required.
You are done when
Nostr reports healthy, the controlled outbound message arrives once, and any accepted inbound message is authenticated and visible in the shared inbox/audit trail.Connect Synology Chat
Set up the extended Synology Chat route over webhook, test the smallest safe scope, and keep direct messages approval-gated.
Before you start
- Synology Chat webhook credentials
- A disposable Synology Chat test conversation or destination.
- A Ready model/provider route if Auto-Reply will be tested.
Open Extensions > Channels and add Synology Chat. Choose Webhook only when it matches the account/bridge you prepared.
Save credentials through the channel secret fields or Secret Store. Grant only the minimum scope needed for Synology Chat messages.
For an extended webhook connector, start with outbound-only testing. Do not enable unsigned inbound delivery; an authenticated bridge and platform signature check are required.
Enable the connector, set DM Access to pairing or an explicit allowlist, and leave Auto-Reply off for the first transport test.
Send Ai Keeper Synology Chat connection test to the disposable destination. Confirm it arrives once and inspect the connector status/inbox.
Only after transport succeeds, enable Auto-Reply for the test destination, send one benign inbound message, approve pairing if requested, and turn Auto-Reply back off if it is not required.
You are done when
Synology Chat reports healthy, the controlled outbound message arrives once, and any accepted inbound message is authenticated and visible in the shared inbox/audit trail.Connect Tlon / Urbit
Set up the extended Tlon / Urbit route over webhook, test the smallest safe scope, and keep direct messages approval-gated.
Before you start
- Tlon/Urbit bridge credentials
- A disposable Tlon / Urbit test conversation or destination.
- A Ready model/provider route if Auto-Reply will be tested.
Open Extensions > Channels and add Tlon / Urbit. Choose Webhook only when it matches the account/bridge you prepared.
Save credentials through the channel secret fields or Secret Store. Grant only the minimum scope needed for Tlon conversations.
For an extended webhook connector, start with outbound-only testing. Do not enable unsigned inbound delivery; an authenticated bridge and platform signature check are required.
Enable the connector, set DM Access to pairing or an explicit allowlist, and leave Auto-Reply off for the first transport test.
Send Ai Keeper Tlon / Urbit connection test to the disposable destination. Confirm it arrives once and inspect the connector status/inbox.
Only after transport succeeds, enable Auto-Reply for the test destination, send one benign inbound message, approve pairing if requested, and turn Auto-Reply back off if it is not required.
You are done when
Tlon / Urbit reports healthy, the controlled outbound message arrives once, and any accepted inbound message is authenticated and visible in the shared inbox/audit trail.Connect Zalo
Set up the extended Zalo route over webhook, test the smallest safe scope, and keep direct messages approval-gated.
Before you start
- Zalo app credentials and signing secret
- A disposable Zalo test conversation or destination.
- A Ready model/provider route if Auto-Reply will be tested.
Open Extensions > Channels and add Zalo. Choose Webhook only when it matches the account/bridge you prepared.
Save credentials through the channel secret fields or Secret Store. Grant only the minimum scope needed for Zalo conversations.
For an extended webhook connector, start with outbound-only testing. Do not enable unsigned inbound delivery; an authenticated bridge and platform signature check are required.
Enable the connector, set DM Access to pairing or an explicit allowlist, and leave Auto-Reply off for the first transport test.
Send Ai Keeper Zalo connection test to the disposable destination. Confirm it arrives once and inspect the connector status/inbox.
Only after transport succeeds, enable Auto-Reply for the test destination, send one benign inbound message, approve pairing if requested, and turn Auto-Reply back off if it is not required.
You are done when
Zalo reports healthy, the controlled outbound message arrives once, and any accepted inbound message is authenticated and visible in the shared inbox/audit trail.Connect QQ Bot
Set up the extended QQ Bot route over webhook, test the smallest safe scope, and keep direct messages approval-gated.
Before you start
- QQ Bot credentials and signing secret
- A disposable QQ Bot test conversation or destination.
- A Ready model/provider route if Auto-Reply will be tested.
Open Extensions > Channels and add QQ Bot. Choose Webhook only when it matches the account/bridge you prepared.
Save credentials through the channel secret fields or Secret Store. Grant only the minimum scope needed for QQ conversations.
For an extended webhook connector, start with outbound-only testing. Do not enable unsigned inbound delivery; an authenticated bridge and platform signature check are required.
Enable the connector, set DM Access to pairing or an explicit allowlist, and leave Auto-Reply off for the first transport test.
Send Ai Keeper QQ Bot connection test to the disposable destination. Confirm it arrives once and inspect the connector status/inbox.
Only after transport succeeds, enable Auto-Reply for the test destination, send one benign inbound message, approve pairing if requested, and turn Auto-Reply back off if it is not required.
You are done when
QQ Bot reports healthy, the controlled outbound message arrives once, and any accepted inbound message is authenticated and visible in the shared inbox/audit trail.Connect WeChat
Set up the extended WeChat route over webhook, test the smallest safe scope, and keep direct messages approval-gated.
Before you start
- WeChat app credentials and signing secret
- A disposable WeChat test conversation or destination.
- A Ready model/provider route if Auto-Reply will be tested.
Open Extensions > Channels and add WeChat. Choose Webhook only when it matches the account/bridge you prepared.
Save credentials through the channel secret fields or Secret Store. Grant only the minimum scope needed for WeChat conversations.
For an extended webhook connector, start with outbound-only testing. Do not enable unsigned inbound delivery; an authenticated bridge and platform signature check are required.
Enable the connector, set DM Access to pairing or an explicit allowlist, and leave Auto-Reply off for the first transport test.
Send Ai Keeper WeChat connection test to the disposable destination. Confirm it arrives once and inspect the connector status/inbox.
Only after transport succeeds, enable Auto-Reply for the test destination, send one benign inbound message, approve pairing if requested, and turn Auto-Reply back off if it is not required.